Benutzer:Thomas/Bilder raten: Unterschied zwischen den Versionen
Thomas (Diskussion | Beiträge) K Änderungen von 5.201.138.26 (Diskussion) wurden auf die letzte Version von Thomas zurückgesetzt |
Neuer Kommentar |
||
| Zeile 242: | Zeile 242: | ||
{{Autor|Thomas Bleher}} | {{Autor|Thomas Bleher}} | ||
== [[bild:Comments.png|<nowiki/>]] Kommentare == | |||
Hi Alchymyth,I used your first code and as usual, it does wonders! However, I have a qotesiun for you.The TEMPLATEPATH reads in the images folder in the parent theme (i.e. Twentyeleven/images/ in my case). If you use a child theme like I do and place the images folder in the child theme folder (i.e. twentyeleven-child/images/), it no longer works.I read somewhere that we could use STYLESHEETPATH but it didn't work !Would you have any suggestion on how to proceed to get the child theme folder?I think this might be useful to everyone reading your great post.Thanks a lot for any suggestion. | |||
<br />-- Hideaki 20:25, 29. Mär. 2013 (CET) | |||
Version vom 29. März 2013, 20:25 Uhr
 Kurzbeschreibung
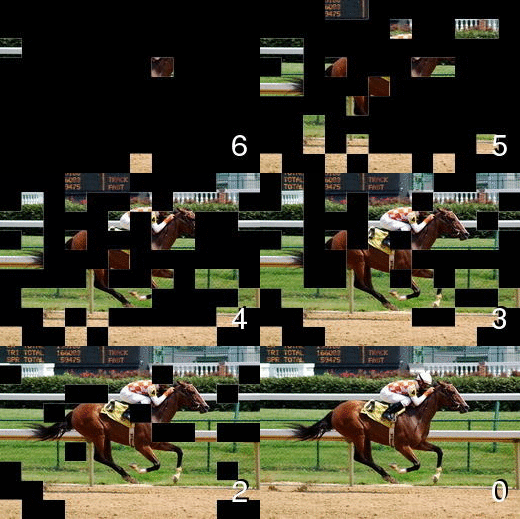
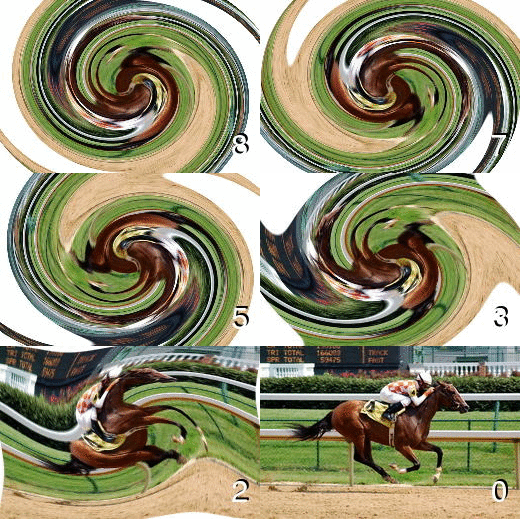
Bilder werden langsam aufgedeckt oder entzerrt und müssen erraten werden
Vorbereitungsaufwand: Hoch (> 1 Stunde)
 Gruppengrößen
Mindestens 1 Leiter. Für beliebig viele Teilnehmer.
 Inhalt
TODO: Beschreibung vervollständigen
Erzeugen der Bilder
Low-Tech
Bilder mit Diaprojektor oder Beamer an die Wand werfen, langsam den Zoom richtig einstellen (dadurch sind die Bilder erst sehr verschwommen)
Linux-Kommandozeile
Black Boxes
black-boxes.sh: <source lang="bash">
- !/bin/bash
shopt -s nullglob
- Erzeugt aus einer Liste von Bildern ein Blockraetsel pro Bild
- Benoetigt Perl und ImageMagick
- Autor: Thomas Bleher <ThomasBleher@gmx.de>
- Name des Ausgabeverzeichnis
OUT_DIR=raetsel-block
- Maximale Bildgroesse (in Pixel fuer Breite bzw. Hoehe)
TARGET_SIZE=1024
- JPG-Bildqualitaet
TARGET_QUALITY=75
- Maximale Punktzahl die man bekommen kann
- die Punktzahl im Bild kann man auch deaktivieren (dazu unten nach POINTS suchen)
MAX_POINTS=6
- Verzeichnis mit den Mustern, die ueber das Bild gelegt werden
PATTERN_DIR=pattern
- Schriftgroesse
FONT_SIZE=30
- Verzeichnisstruktur vorher:
- pattern/
- pattern/003.png
- pattern/006.png
- ...
- input/kategorie1/bilda.jpg
- input/kategorie1/bildb.jpg
- input/kategorie2/bildc.jpg
- Aufruf dieses Programms in Verzeichnis input/
- (Verzeichnis darf auch anders heissen, aber parallel dazu muss
- das Verzeichnis pattern liegen, und es muss eine Unterverzeichnis-
- Ebene geben (die Kategorien)
- Danach:
- pattern/
- pattern/003.png
- pattern/006.png
- pattern/009.png
- ...
- input/kategorie1/bilda.jpg
- input/kategorie1/bildb.jpg
- input/kategorie2/bildc.jpg
- ...
- raetsel-block/kategorie1/1/bilda_003.jpg
- raetsel-block/kategorie1/1/bilda_006.jpg
- raetsel-block/kategorie1/1/bilda_009.jpg
- raetsel-block/kategorie1/2/bildb_003.jpg
- raetsel-block/kategorie1/2/bildb_006.jpg
- raetsel-block/kategorie1/2/bildb_009.jpg
- raetsel-block/kategorie2/1/bildc_003.jpg
- raetsel-block/kategorie2/1/bildc_006.jpg
- raetsel-block/kategorie2/1/bildc_009.jpg
- Die Anzahl der entstehenden Bilder pro Ursprungsbild wird durch die
- Anzahl der Bilder in pattern/ festgelegt.
mkdir -p "../$OUT_DIR" echo -n > "../$OUT_DIR/list.txt" for dir in * do if [ -d "$dir" ] then mkdir -p "../$OUT_DIR/$dir" IMG_NR=0 for j in "$dir"/*.jpg "$dir"/*.JPG do echo "Processing $j..." IMG_NR=$(( $IMG_NR + 1)) mkdir -p "../$OUT_DIR/$dir/$IMG_NR" PRAEFIX="`echo "$j" | perl -pe 's,.*/,,;s/\..*?$//'`" echo -ne "$dir: $IMG_NR=$PRAEFIX\r\n" >> "../$OUT_DIR/list.txt" convert "$j" -resize ${TARGET_SIZE}x${TARGET_SIZE}\> tmp_img.jpg SIZE=`identify tmp_img.jpg | cut -d\ -f3`\! NR_ITERATIONS=`ls ../pattern/*.png | wc -l` NR=0 for i in "../$PATTERN_DIR/"*.png do POINTS=`perl -e "print int((($NR_ITERATIONS - $NR - 2) * $MAX_POINTS / $NR_ITERATIONS) + 1);"` OUT="../$OUT_DIR/$dir/$IMG_NR/${PRAEFIX}_`basename $i .png`.jpg" if [ ! -e "$OUT" ] then convert "$i" -scale "$SIZE" -transparent "#ffffff" tmp_pat.png composite tmp_pat.png tmp_img.jpg tmp_img_out.jpg # um keine Punkte anzuzeigen, naechste Zeile auskommentieren # POINTS="" convert tmp_img_out.jpg -pointsize $FONT_SIZE \
                                           -draw "gravity SouthEast fill black text 10,12 '$POINTS' fill white  text 12,10 '$POINTS'" \
                                           -quality $TARGET_QUALITY "$OUT"
fi NR=$(($NR + 1)) done done fi done </source>
Zusatzskript zum Erzeugen der Muster:
<source lang="perl">
- !/usr/bin/perl
use warnings; use GD; use List::Util 'shuffle';
- ein kleines Programm, um kleine PNG-Dateien mit Mustern zu erzeugen, die
- fuer ein Block-Raetsel ueber die Bilder gelegt werden koennen.
- Man kann aber auch die schon vorhandenen Muster unter pattern benutzen
- Autor: Thomas Bleher <ThomasBleher@gmx.de>
- Benoetigt unter Debian/Ubuntu libgd-gd2-perl oder libgd-gd2-noxpm-perl
- Anzahl Pixel waagrecht
my $width = 12;
- Anzahl Pixel senkrecht
my $height = 9;
- wie viele Pixel werden pro Schritt aufgedeckt
my $step = 3;
- create a new image
$im = new GD::Image($width, $height);
- allocate some colors
$white = $im->colorAllocate(255,255,255); $black = $im->colorAllocate(0,0,0);
- make the background transparent and interlaced
$im->transparent($white); $im->fill(0,0,$black);
my $count = 0; for my $pixel (shuffle(0..$height*$width-1)) { my $x = $pixel % $width; my $y = int($pixel / $width); $im->setPixel($x, $y, $white); $count++; if( $count % $step == 0 ) { open PNG, ">", sprintf("%03d.png", $count); print PNG $im->png; close PNG; } } </source>
Swirl
<source lang="bash">
- !/bin/bash
shopt -s nullglob
- Erzeugt aus einer Liste von Bildern ein Verdrehraetsel pro Bild
- Benoetigt Perl und ImageMagick
- Autor: Thomas Bleher <ThomasBleher@gmx.de>
- Name des Ausgabeverzeichnis
OUT_DIR=raetsel-swirl
- Maximale Bildgroesse (in Pixel fuer Breite bzw. Hoehe)
TARGET_SIZE=1024
- JPG-Bildqualitaet
TARGET_QUALITY=75
- Maximale Punktzahl die man bekommen kann
- die Punktzahl im Bild kann man auch deaktivieren (dazu unten nach POINTS suchen)
MAX_POINTS=8
- Schriftgroesse
FONT_SIZE=30
- Maximaler Verdrehwinkel
MAX=720
- Verdrehwinkel in Grad pro Schritt
STEP=-20
- Wichtig: MAX muss durch STEP ohne Rest teilbar sein!
NR_ITERATIONS=`seq $MAX $STEP 0 | wc -l`
mkdir -p "../$OUT_DIR" echo -n > "../$OUT_DIR/list.txt" for dir in * do if [ -d "$dir" ] then mkdir -p "../$OUT_DIR/$dir" IMG_NR=0 for j in "$dir"/*.jpg "$dir"/*.JPG do echo "Processing $j..." IMG_NR=$(( $IMG_NR + 1)) mkdir -p "../$OUT_DIR/$dir/$IMG_NR" PRAEFIX="`echo "$j" | perl -pe 's,.*/,,;s/\..*?$//'`" echo "$dir: $IMG_NR=$PRAEFIX" >> "../$OUT_DIR/list.txt" convert "$j" -resize ${TARGET_SIZE}x${TARGET_SIZE}\> tmp_img.jpg NR=0 for i in `seq $MAX $STEP 0` do POINTS=`perl -e "print int((($NR_ITERATIONS - $NR - 2) * $MAX_POINTS / $NR_ITERATIONS) + 1);"` SUFFIX=`perl -e "printf '%04d', abs($MAX - $i);"` # implode max 0.5 #IMPLODE=`echo "$i / ($MAX) / 2" | bc -l` BORDER=`perl -e "print int($i * $TARGET_SIZE / ($MAX * 5));"` OUT="../$OUT_DIR/$dir/$IMG_NR/${PRAEFIX}_$SUFFIX.jpg" if [ ! -e "$OUT" ] then # um keine Punkte anzuzeigen, naechste Zeile auskommentieren # POINTS="" convert tmp_img.jpg -bordercolor white -border ${BORDER}x${BORDER} \
                                           -swirl $i -shave ${BORDER}x${BORDER} -pointsize $FONT_SIZE \
                                           -draw "gravity SouthEast fill black text 10,12 '$POINTS' fill white  text 12,10 '$POINTS'" \
                                           -quality $TARGET_QUALITY "$OUT"
fi NR=$(($NR + 1)) done done fi done </source>
- Autor
- Thomas Bleher
 Kommentare
Hi Alchymyth,I used your first code and as usual, it does wonders! However, I have a qotesiun for you.The TEMPLATEPATH reads in the images folder in the parent theme (i.e. Twentyeleven/images/ in my case). If you use a child theme like I do and place the images folder in the child theme folder (i.e. twentyeleven-child/images/), it no longer works.I read somewhere that we could use STYLESHEETPATH but it didn't work !Would you have any suggestion on how to proceed to get the child theme folder?I think this might be useful to everyone reading your great post.Thanks a lot for any suggestion.
-- Hideaki 20:25, 29. Mär. 2013 (CET)

